Large Format Printer Parts – A Guide (Inside)
The basic idea of inkjet printing is that a moving box (the carriage) contains a second box (the print heat) which squirts ink onto a piece of paper. While this is happening, the paper is pushed forward, and the two parts are synchronised to get the right colours in the right place. We’re going to show you how the inside of a large format printer works to get you amazing results.
We’re going to make sure you understand all the large format printer parts in this two-part guide. We’re going to use the Canon TM-200 as a base, as it’s one of the most popular CAD printers out there. However, the information can be applied to many large format printers.
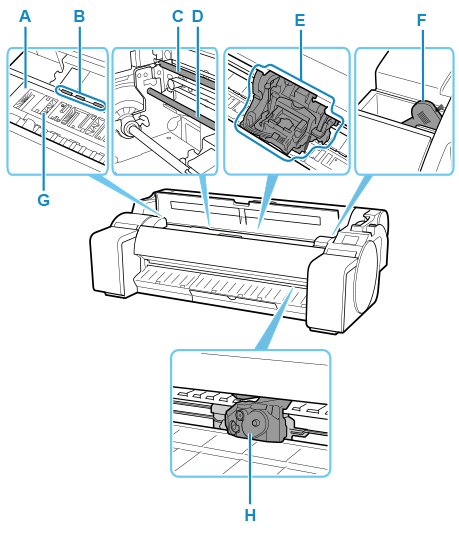
Top Cover (Inside)

(A) Platen
This is the flat surface (think “plate”) that the paper rests on during printing. The print head then moves across this, spraying ink onto the paper.
(B) Paper Retainer
During inkjet printing, the paper is pushed through the machine. These retainers hold it in place to ensure that the ink is going to the correct spot on the page.
If you don’t do regular cleaning maintenance on your large format printer, then you risk debris and ink getting onto these. When that happens, they won’t be able to keep the paper in place perfectly, which can cause printing errors.
(C) Linear Scale
This part is used to control the speed and position of the carriage. There are lots of little black lines which tell the carriage where it is, and the number of them it passes tells it the speed. Think of this as the “map” for the printer.
Do not touch this during cleaning, because it can cause a serious malfunction if damaged.
(D) Carriage Shaft
The Carriage slides along this shaft.
(E) Carriage
Moves the print head. The carriage serves a key role in printing.
(F) Cleaning Brush
When cleaning inside the printer under the top cover, use this brush to sweep away paper dust on the platen. If you find spots on the underside of your prints, then use this to wipe down the platen.
(G) Borderless Printing Ink Grooves
This is a sort of drain for any overspill during borderless printing. It’s important to clean these out every month during routine maintenance.
(H) Cutter Blade
A round-bladed guillotine cutter for automatic paper cutting. This is vital for when printing from a roll, rather than pre-cut sheets.
Roll Paper Cover (Inside)
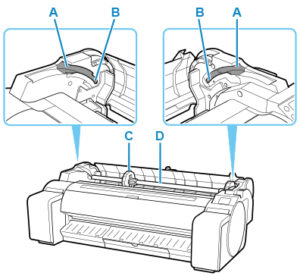
(A) Slide Guide
This is a hole in the side of your large format printer to make sure you get the roll holder into the correct position every time.
(B) Roll Holder Slot
Slide the roll holder into this slot using the slide guide.
(C) Holder Stopper
Secure the roll on the roll holder with these parts. They’re labelled L and R so you can always get them the right way round.
There is a small lever on them to unclip them from the roll holder so you can take them off and put the fresh roll of paper in.
(D) Roll Holder
Load the roll on this holder. It’s also labelled with L for left and R for right, so you can always put it in the correct way.
Carriage
The carriage is little more than a vessel to move the print head.
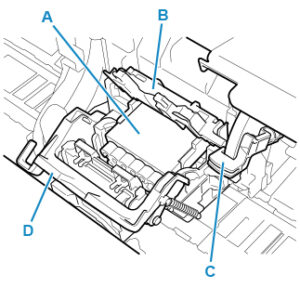
(A) Print Head
The printhead is equipped with ink nozzles, which squirt the ink onto the page.
If the print head isn’t used enough, then it can clog if little pieces of dust gets inside it, or ink residues dry up. Replacing a print head is a simple task, and involves opening up the carriage, taking out the print head, then simply slotting another one in its place. The touchscreen should be giving instructions at each stage of this process.
Writing the date of install on your new print head is a good way to track your inventory and monitor how long each one is lasting.
(B) Print Head Locking Cover
Secures the print head.
(C) Angle Adjustment Lever
If you have a problem with alignment when printing, then adjusting this can be an easy fix. There are a series of notches on the scale beneath the lever which can be used to fine tune the alignment.
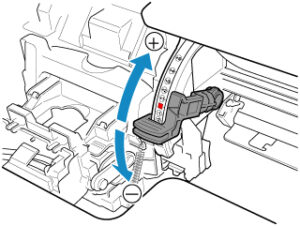
This process requires you to put the lever into the default position, print a test page, then line it up in the direction needed to correct any faults.
(D) Print Head Lock Lever
Lock print head locking cover. Flick this before opening up the carriage to replace the print head.
Ink Tank Cover (Inside)
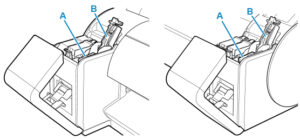
(A) Ink Tank
Cartridges of ink in various colours.
(B) Ink Tank Lock Lever
A lever that locks the ink tank in place and protects it. Lift and press down the lever when replacing an ink tank.
Check out the other part of this guide where we look at the outside parts of a large format printer.
Get in touch with us at Design Supply and we’ll help you find the perfect printer for your specific application, or repair your existing machine and get it back to perfect working order.