Large Format Printer Parts – A Guide (Outside)
We’re going to make sure you understand all the large format printer parts in this two-part guide. We’re going to use the Canon TM-200 as a base, as it’s one of the most popular CAD printers out there. However, the information can be applied to many large format printers.
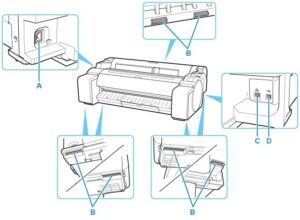
The Front
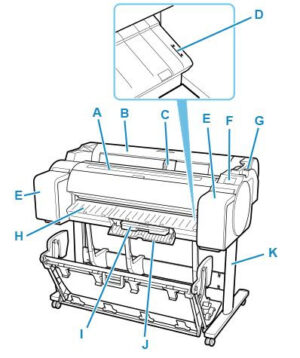
(A) Top Cover
Open this cover to install the print head and remove any jammed paper from inside the printer, as needed.
This part is opened with a simple hinge, but you have to push the Release Lever first to lift it up.
(B) Roll Paper Cover
Open this cover to load rolls. Again, make sure you push the Release Lever first.
(C) Width Guide
When loading the sheets , move the guide to match the paper size.
(D) Paper Alignment Line
A white line for alignment of paper.
(E) Ink Tank Cover
Open this cover to replace the ink tank.
(F) Operation Panel
Use this screen to operate the printer and check the printer status. We’ll go into more detail about this later.
(G) Release Lever
When releasing the Paper Retainer, push this lever back.
(H) Output Guide
Supports output paper into the basket.
(I) Maintenance Cartridge
This is a bit like the drip tray on a beer pump, or the crumb tray on a toaster. It collects the excess ink during printing, and from print head cleaning.
Replace this when it’s full. With our Design Supply and Service, we’ll be alerted whenever it fills up and we’ll send a replacement out to you.
(J) Maintenance Cartridge Cover
Open this cover to replace the maintenance cartridge. It’s a little trap door that simply pulls open. No need to pull the release lever.
(K) Stand
This is equipped with casters to facilitate moving it. Keep in mind this comes shipped in a separate box during delivery, but we’ll fully install your machine for you.
Desktop printers such as the Canon TC-20 won’t necessarily have a stand.
The Stand
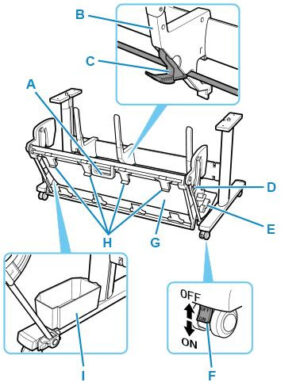
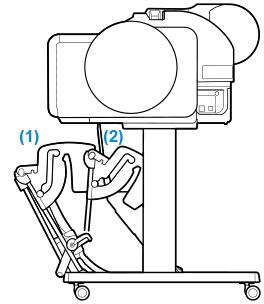
The stand has two positions. It can be extended, in order to catch your large format prints, or reclined, for easy storage and movement.
(A) Basket Handle
This is simply a rigid handle, so that you have something to grip as you move the basket from extended to reclined position.
(B) Paper Guide
Guides the output printed documents to the basket.
(C) Adjustable Stopper
Extends according to the paper size. When printing A1, pull this out once you’ve extended the basket using the support rod.
(D) Support Rod
Use this to change the position of the basket from reclined to extended.
(E) Basket Release Lever
Releases the basket when it is set in the extended position B and the lever is pulled forward.
(F) Locking Caster
The casters can be locked securely. When moving the printer, be sure to unlock the 4 casters. If you move it while the locking casters are locked, the floor may become scratched.
(G) Basket
Catches your large format prints. For best results, only store one in the basket at a time, removing each document once it’s been printed. However, it can store up to 20 in its extended position.
It can hold documents from up to 48 inches (1219.2 mm) long.
Don’t wash the basket, simply wipe it down with a cloth.
(H) Basket Ejection Guides
This guide helps the paper into the basket, ensuring it stays on track.
(I) Accessory Pocket
Stores the printer’s accessories. This can include cleaning materials, such as swabs and cloths.
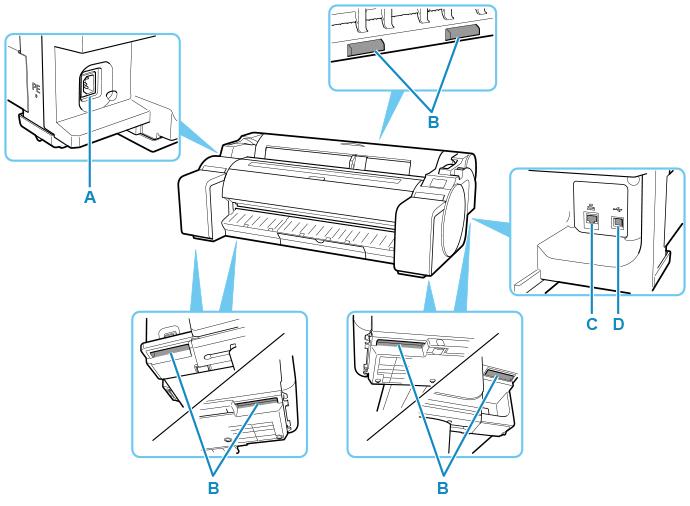
The Back
(A) Power Cord Connector
Connect the power cord to this connector.
(B) Carrying Grips
When moving the printer, have three or more people holding it by these handles under both sides. This will avoid anyone placing their hands on any delicate or dangerous parts.
Hold the left and right of these parts when moving the printer with a stand, which are shown at the bottom of the diagram. This will give you the best grip and ease of movement.
(C) Wired LAN Connector
Connect an Ethernet cable to this port. The lamp is lit if the Ethernet cable is connected correctly and communication is possible between the computer and printer.
(D) USB Port
Connect a USB cable to this port. The printer is compatible with Hi-Speed USB connections. A usual USB plug won’t fit in here though, use a type-B connection, which is the standard for printers.
The Operations Panel

On most modern Large Format Printers, this will be a touch screen.
A: HOME button
The HOME screen appears.
B: Back button
Displays the screen before the current screen.
C: Stop button
Cancels print jobs in progress and ends the ink drying period. This refers to the fan which blows on the prints as they come out.
D: ON button/ON lamp
Turns the printer on and off.
The ON lamp is lit when the printer is on or in Sleep mode.
E: Touch Screen
Shows printer menus, as well as the printer status and messages. You can select menu items and display buttons by gently touching the screen with your fingertip.
F: Status lamp
The below codes will differ based on your model. However, expect most large format printers to tell you similar information. On a home printer, the lamp will likely have more modes, as it will not always have a screen to refer you to. A professional large format printer will be able to give you a written error report on the screen.
If an error code is displayed, write it down in order to inform your technician.
Flashing (white)
During printing, this lamp flashes when the printer is receiving or processing print jobs. Otherwise, this lamp flashes when the print job is paused or the printer is updating the firmware.
Lit (orange)
A warning message is displayed.
Flashing (orange)
An error message is displayed.
Off
There are no active print jobs, warnings, or errors.
The Touchscreen

A: Printer Information Display Area
Displays the printer status, messages, and other information. Tap this item when a message appears to view the message on the list screen and to jump to the screen with detailed information and operations.
B: Paper Setting Display Area
Displays the information on loaded paper on the upper area. Tapping this option displays the menu relating paper and allows the paper settings. Replace paper and Feed/Cut frequently used in the menu appears on the lower area, and you can directly select.
C: Network
Displays the current network status. Select to display the basic network information or to change the network settings.
D: Ink information
Select when checking current estimated ink levels or replacing ink tanks.
Once you press this, a tutorial will play out guiding you through the various stages of the process.
E: Setup
Select when changing the printer settings, performing maintenance, or checking printer information.
Some of the options in here shouldn’t be touched, except by a technician. These may or may not be labelled as such. Debugging is an operation which should be left to a technician. Refer to your manual to make sure which can be altered by a standard user.
F: Job management
Select when checking or deleting print jobs. A more advanced version of this is available on the Canon software that comes free with your large format printer. This particular option is useful for a quick check at your machine so you don’t have to return to your computer, rather than a comprehensive overview.
Get in touch with us if you want to learn more about large format printers!